FAQ Overview
Getting Started
Website Registration
Author:
Last update: 2025-07-08 04:00
How To Create an Account
-
From the landing page, navigate to the “Get Started” button in the top right
-
Either sign in with your google account, or input your name, email address, phone number, and create a strong password

- Validate your new account by clicking the confirmation link send to your email address
Author:
Last update: 2025-07-15 23:35
Website Help
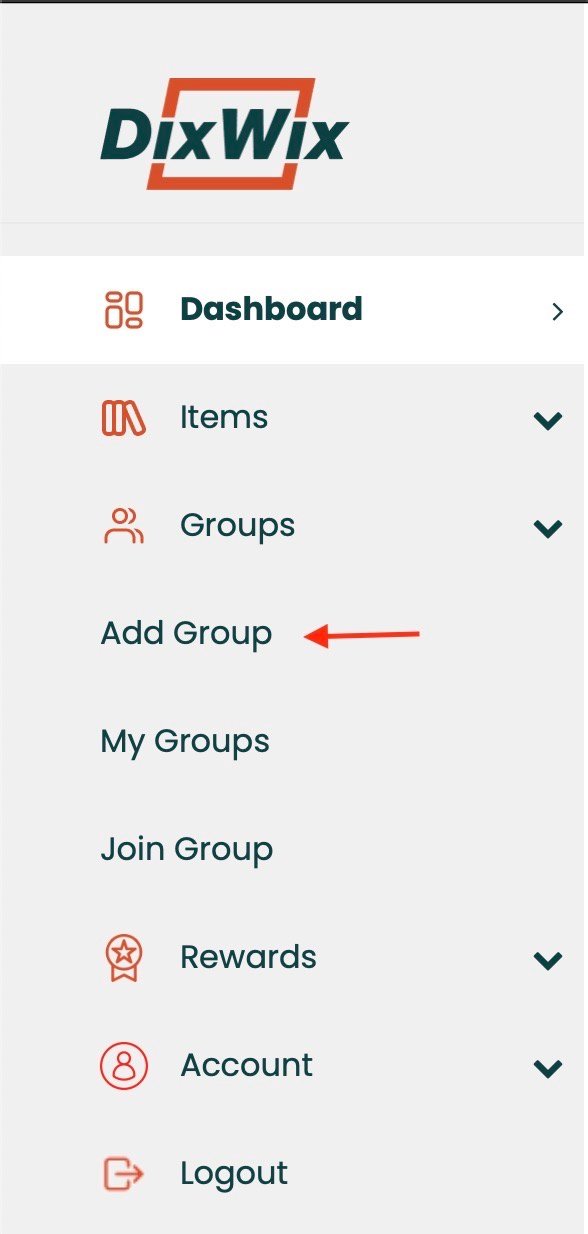
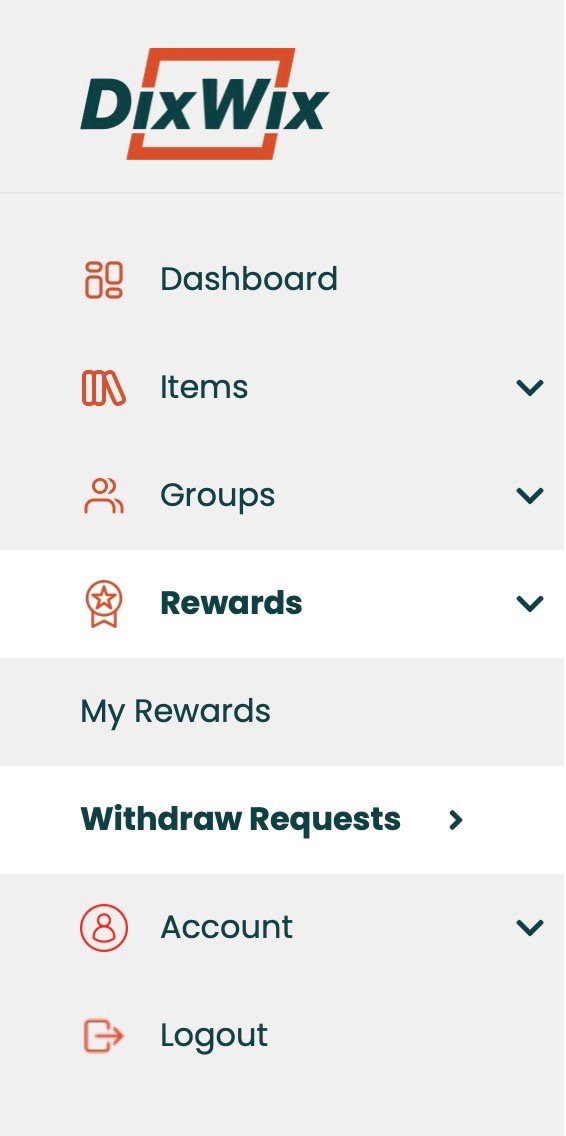
Dashboard
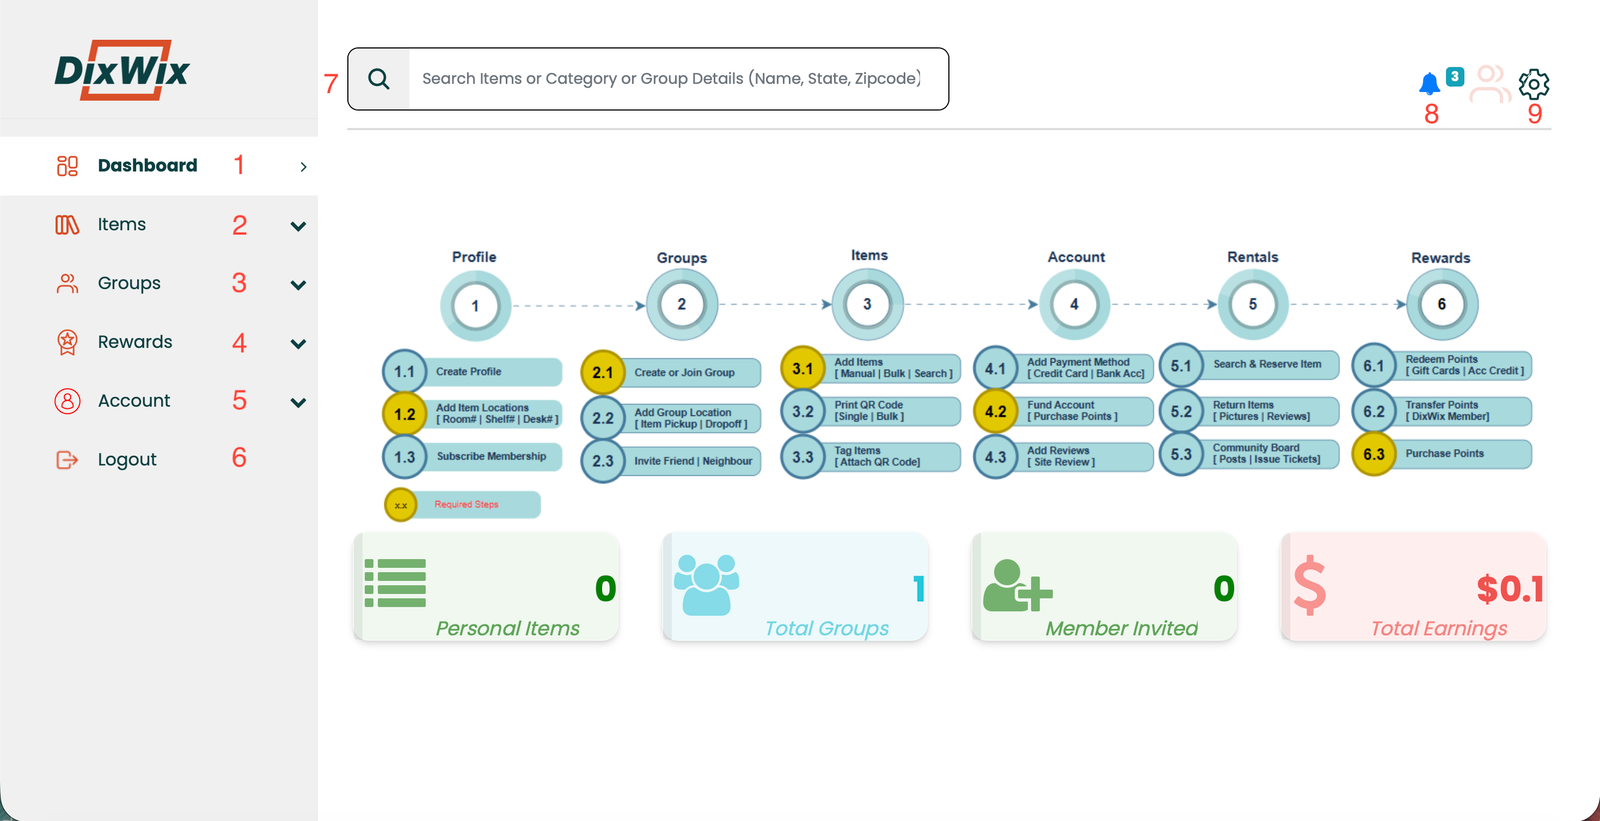
#1 - Dashboard: Click to return to your dashboard
#2 - Items: Click to view your items, add items, or view your borrowed items
#3 - Groups: Click to create a group, view your groups, or join a group
#4 - Rewards: Click to redeem, transfer, or purchase points; view your transaction history
#5 - Account: Click to manage account details or review the website
#6 - Logout: Click to logout of DixWix
#7 - Search Bar: Use this field to search for groups, items, or categories across the whole site
#8 - Notifications: Click to view your notifications
#9 - Profile: Click to manage your profile details
Author:
Last update: 2026-04-09 04:58
Website Help » Items
How to manually add items
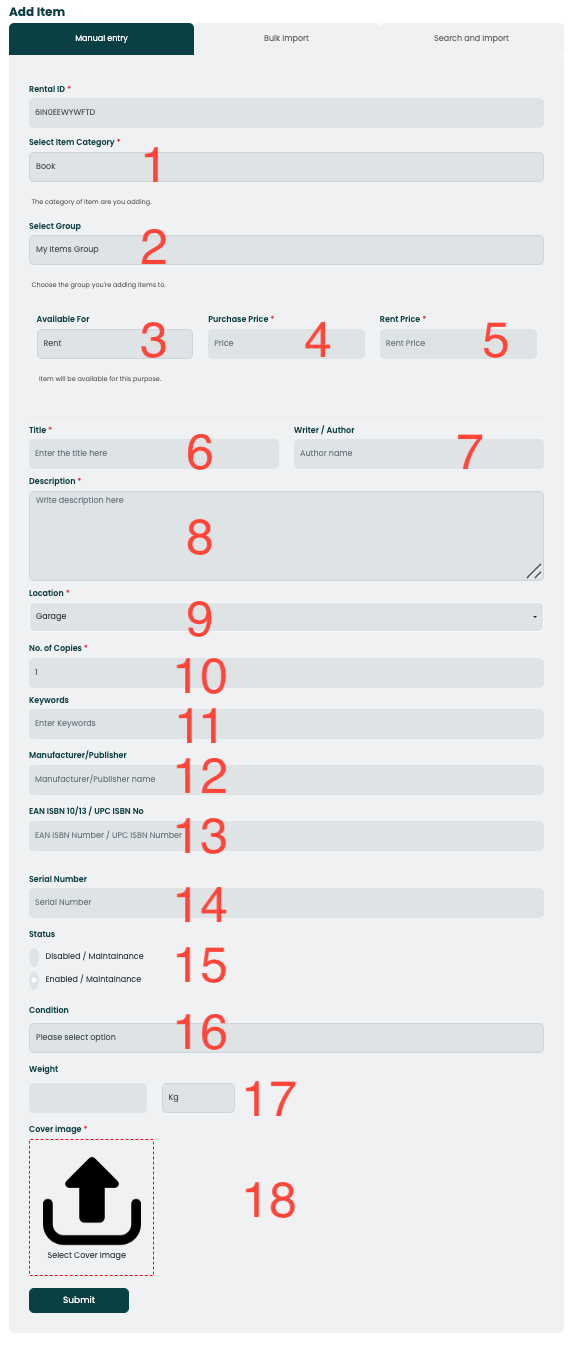
**All fields marked with a red star are required**
#1 - Select the item category
#2 - Select which group the item will go in
#3 - Select what the item will be up for
#4 - Enter how much you purchased the item for
#5 - The rental price will be determined by the purchase price. Change it if you want
#6 - Enter the name of the item
#7 - Enter the name of the author/maker
#8 - Enter a description for the item
#9 - Select the location of the item
#10 - Enter how many of the item you have
#11 - Enter keywords for the item (they will make searches for them easier)
#12 - Enter the manufacturer/publisher
#13 - If item is a book, enter the ISBN number
#14 - You may add a serial number to the item for identification
#15 - Select whether the item is in useable condition
#16 - Select the condition of the item (poor - new)
#17 - Enter the weight of the item (pounds or kilograms)
#18 - Upload a cover image
Author: Pratik Behera
Last update: 2026-04-09 04:59
How to bulk import items from csv
Locate the left sidebar and select the Items -> Add Items Menu
Author: Pratik Behera
Last update: 2026-03-13 05:01
How to bulk print QR Codes
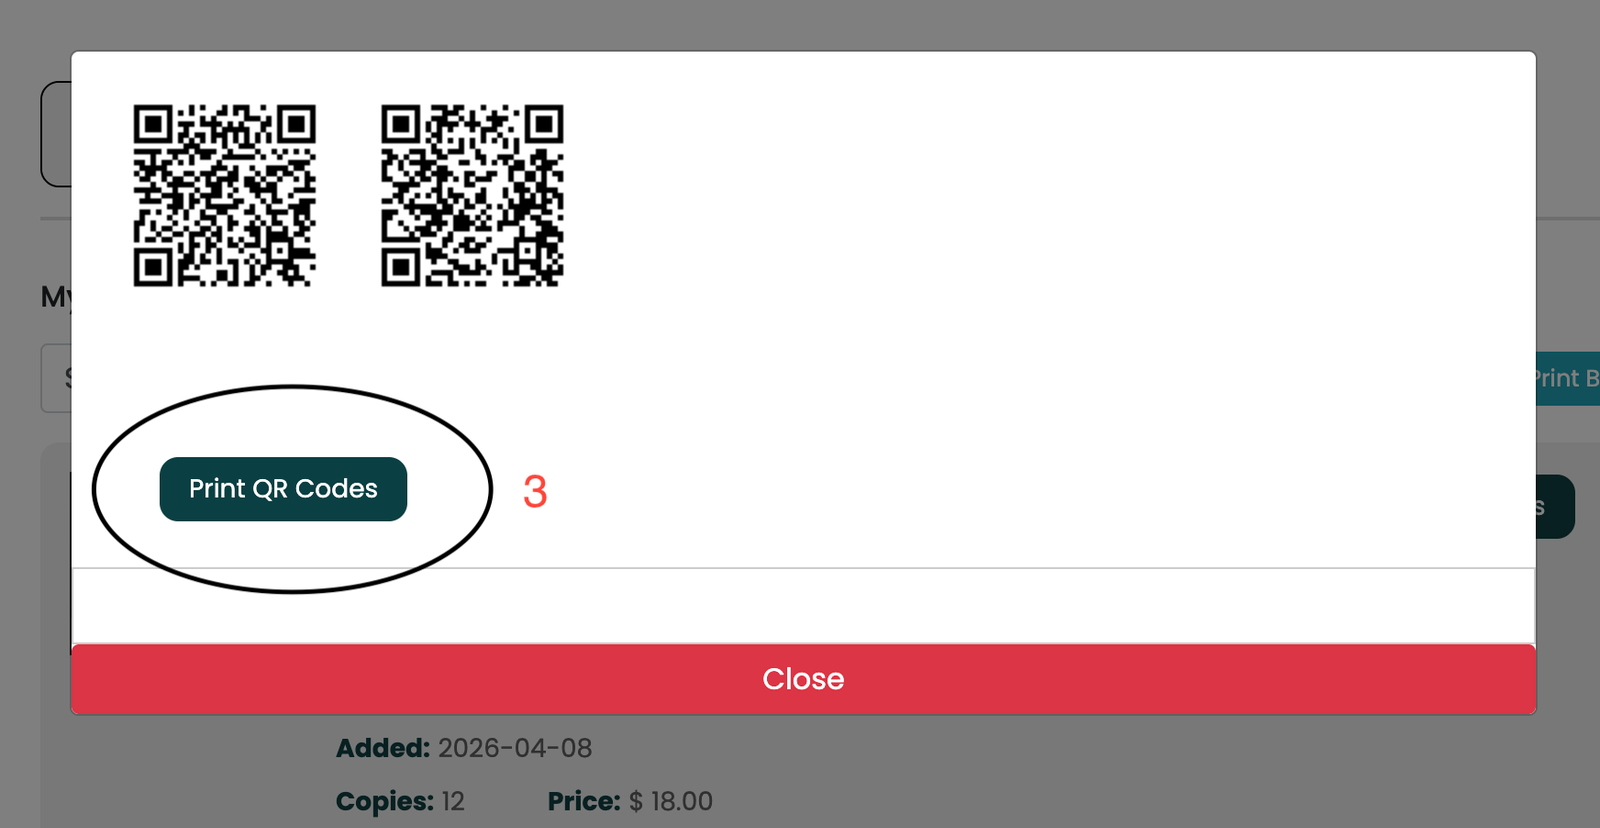
#1 - Select the items you want to print QR codes for
#2 - Click the bulk print button
#3 - Click the button to print the QR codes
Author:
Last update: 2026-04-09 04:59
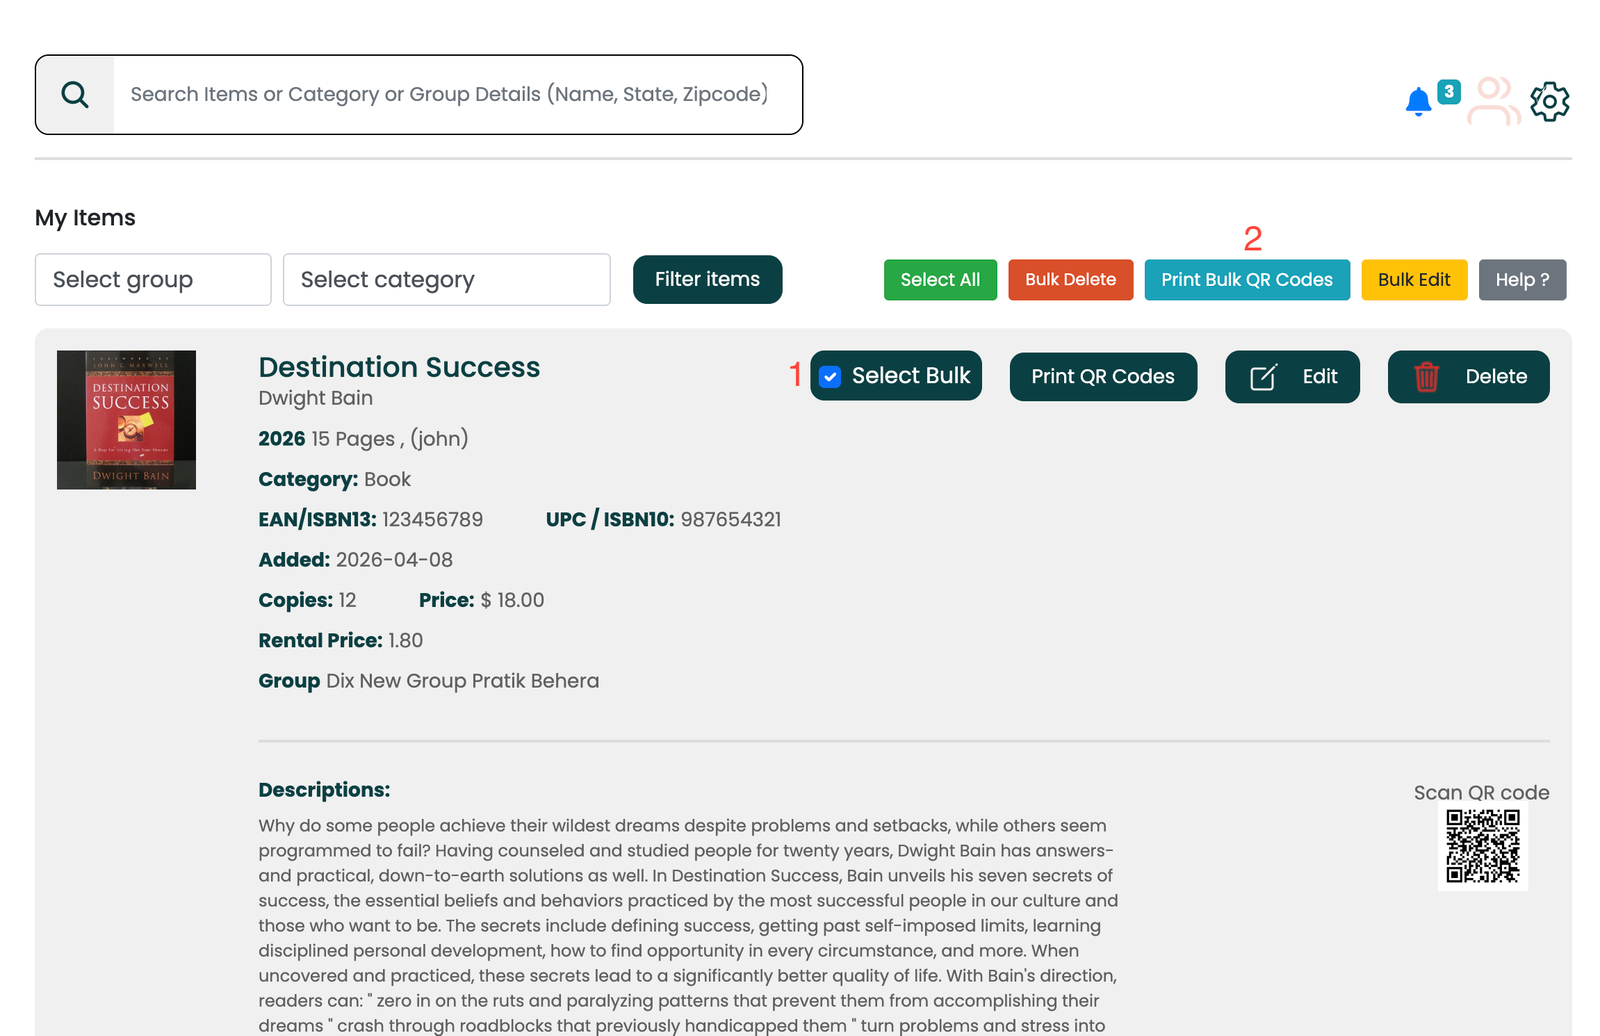
My Items Help
#1 - Search Bar: Search for a specific item
#2 - Group Filter: Filter items by group
#3 - Category Filter: Filter items by category
#4 - Filter items: Apply selected filters to item list
#5 - Select all: Bulk select all items
#6 - Bulk delete: Delete all selected items
#7 - Bulk print QR codes: Print QR codes for all items
#8 - Bulk edit: Edit all selected items
#9 - Help: Click to go to support page
#10 - Select item: Selects item to be affected by 6, 7, and 8
#11 - Print QR codes: Prints QR code for item
#12 - Edit: Edit the item
#13 - Delete: Delete item
Author:
Last update: 2026-04-09 04:59
How to Bulk Edit Items


#1 - Select items to be bulked edited
#2 - Click to open bulk edit screen
A: Change properties of all selected items
B: Change properties of each item individually
Author:
Last update: 2026-04-09 04:59
How to bulk Import items (docs, excel, csv)
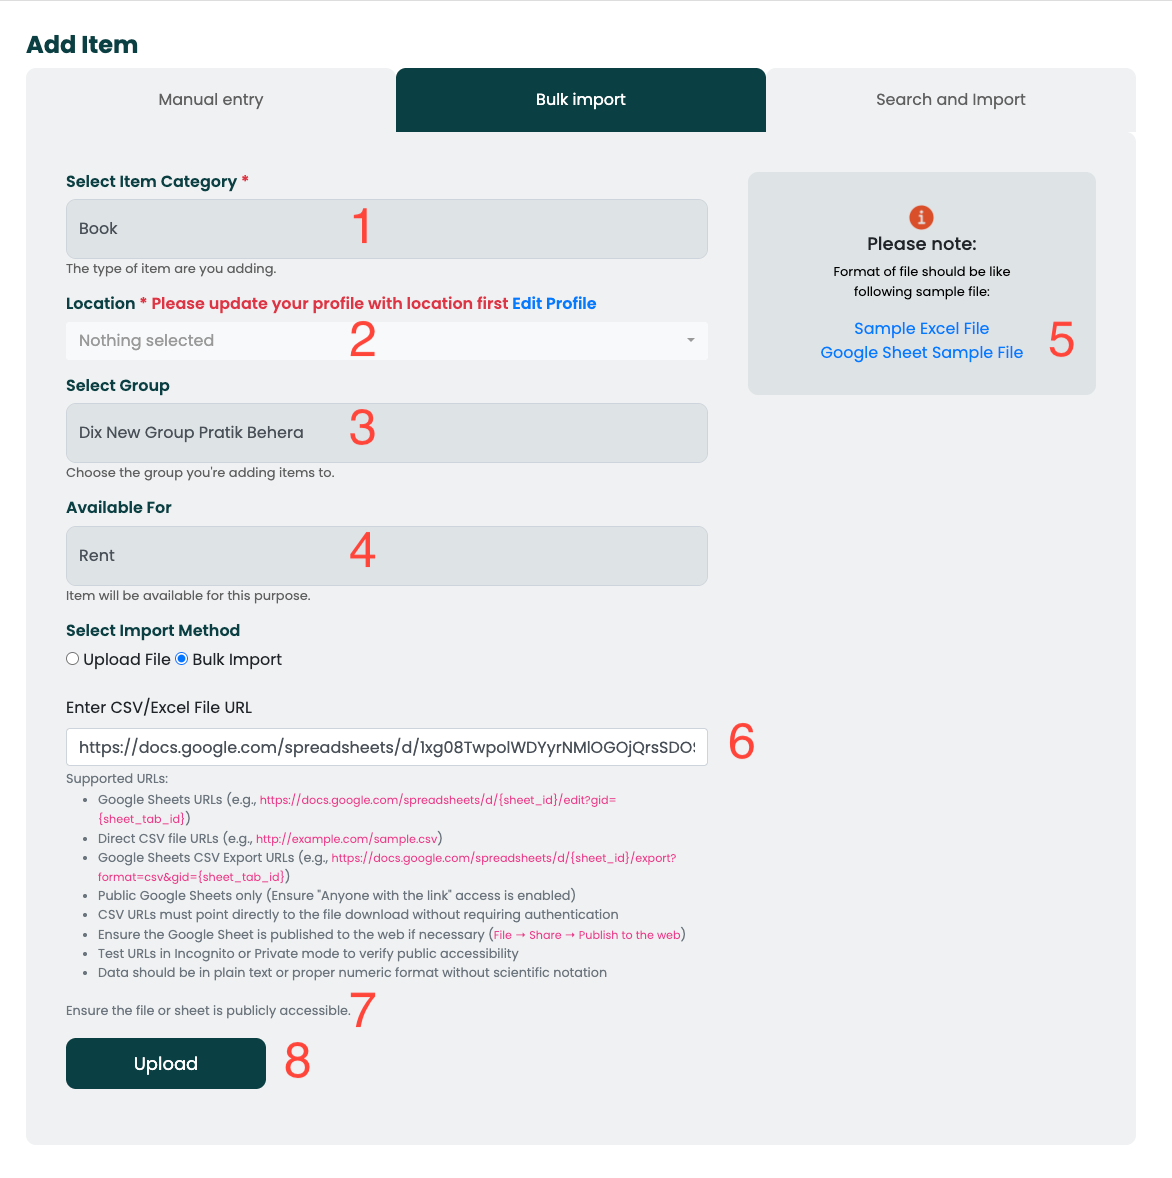
#1 - Select the category for your items
#2 - Select the location for your items (See profile help for more details on how to add locations)
#3 - Select which group you want to add your items to
#4 - Select what the items will be available for
#5 - Ensure your file matches the corresponding format from the sample files
#6 - Paste the link of the file into the field. It can be a Google Doc, an Exel file, or CSV file. Exel and CSV files also have an upload option
#7 - Make sure your file is publicly accessible. Anyone should be able to access it with the link
#8 - Upload your file
Author:
Last update: 2026-04-09 05:34
How to Search & Import Items
Author:
Last update: 2026-03-13 05:11
Borrowed Items Page
Author:
Last update: 2026-03-13 05:12
Website Help » Groups
How to create a group
- Locate the left sidebar
- Select the groups drop down menu and select add group
- Create a group title and description. Fill in state and country fields. Zip Code is optional but recommended
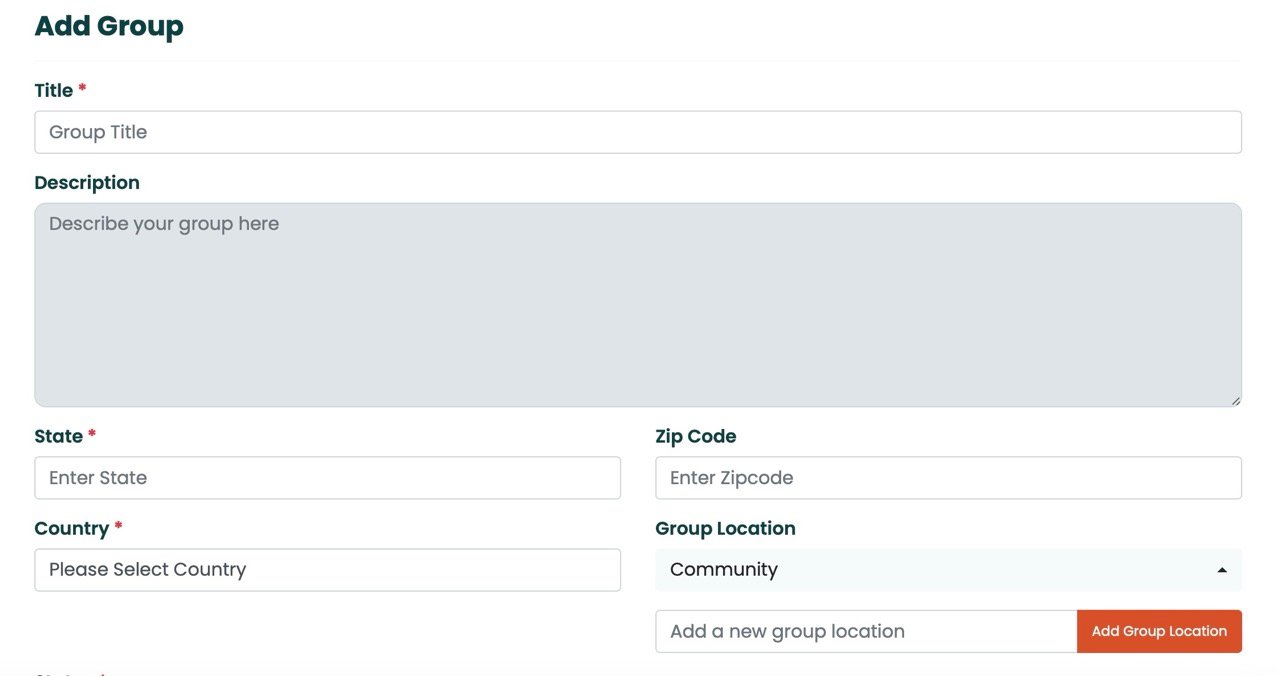
- Create locations for the group to represent a central hub for sharing items
Designate the group as shared or private. Shared will allow you to add other members and private will only be accessible to you
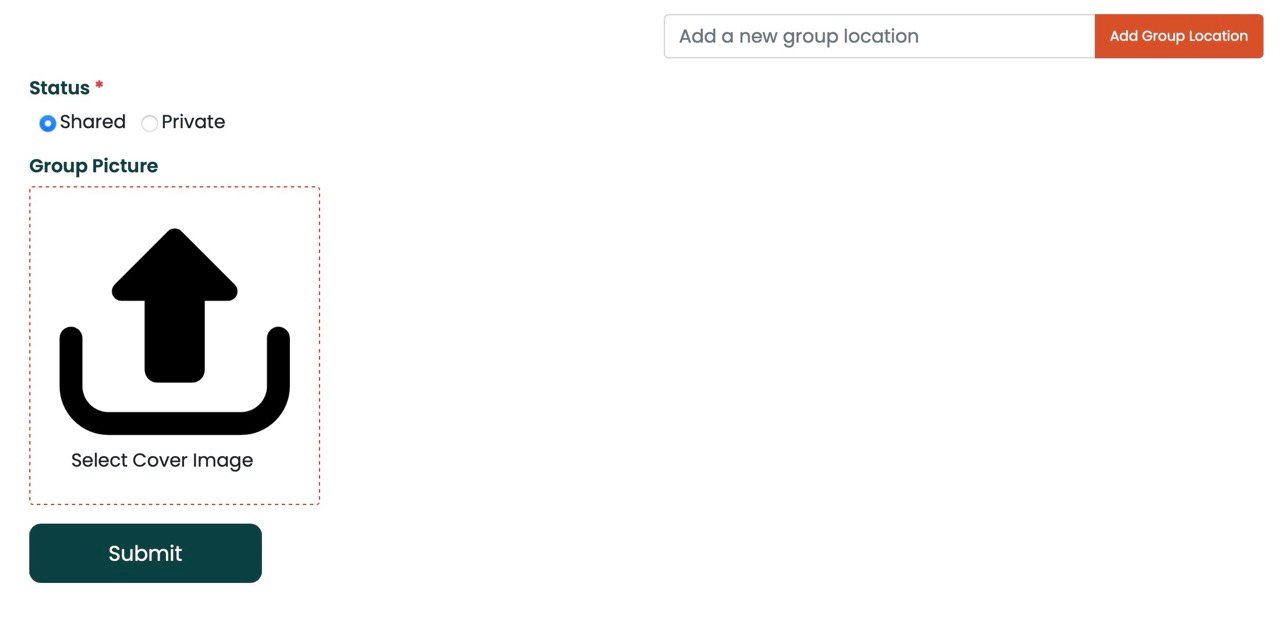
- Add a cover image
- Submit the group
Author: Pratik Behera
Last update: 2026-03-13 05:00
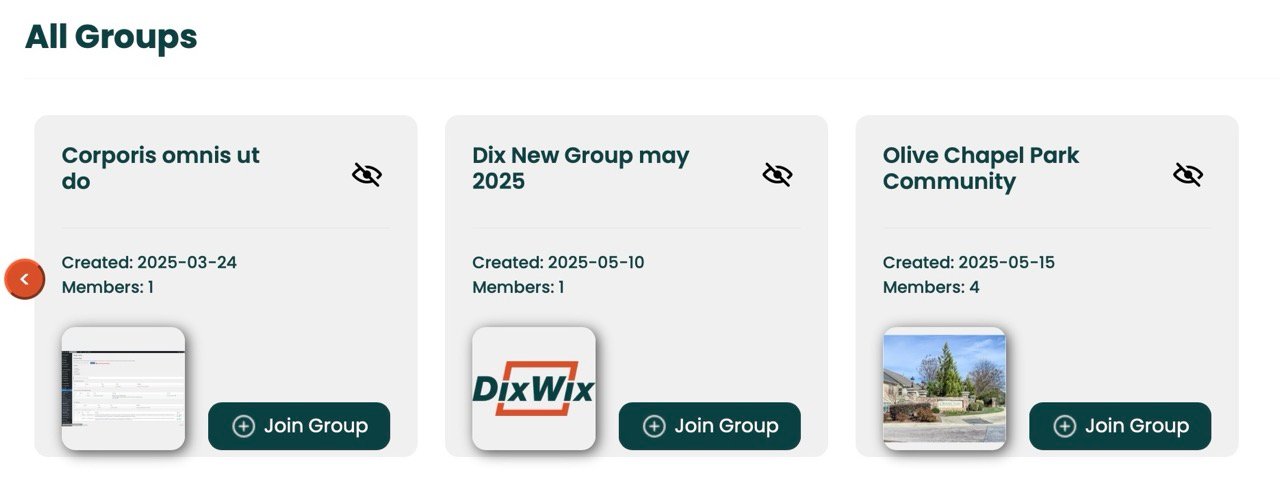
How to join a group
Locate the left sidebar and select the groups drop down menu. Select join group
Browse the groups in the area and select join group to send a join request to the group owner
Author: Pratik Behera
Last update: 2026-03-13 05:00
My Groups Page Help
Author:
Last update: 2026-03-13 05:14
Join Group Help
Author:
Last update: 2026-03-13 05:15
Community Group Page
Group Details
Participants
Rental and Returns
Tickets
Posts
Author:
Last update: 2026-03-13 05:31
Website Help » Rewards
How to purchase rewards points
Locate the left sidebar and select the rewards drop down menu
Select my rewards
Navigate to the purchase points section

Purchase the desired amount of points. 1pt = 1¢
Author: Pratik Behera
Last update: 2026-03-13 05:01
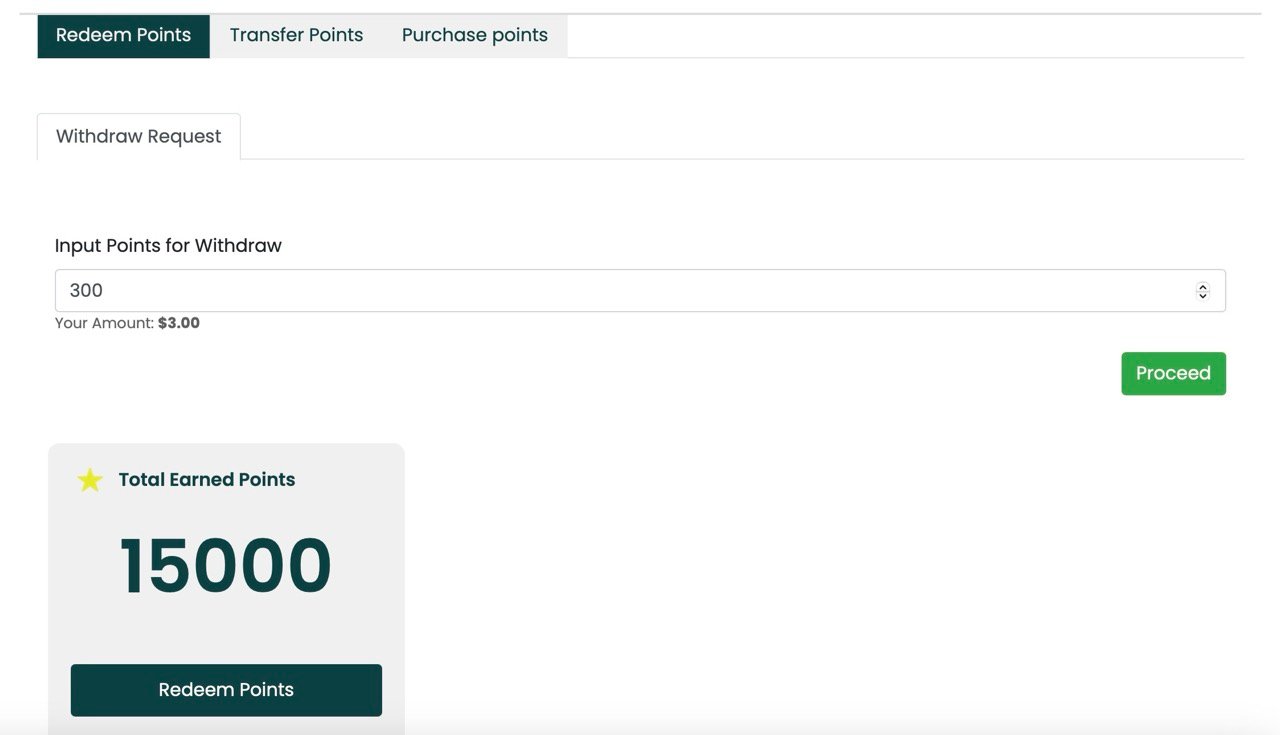
How to redeem rewards points
-
Locate the left sidebar and select the rewards drop down menu
-
Select my rewards

-
Select redeem points if not already open
-
Select the redeem points button, enter the amount of points to withdraw, and enter. You must have a default payment method for this to work
-
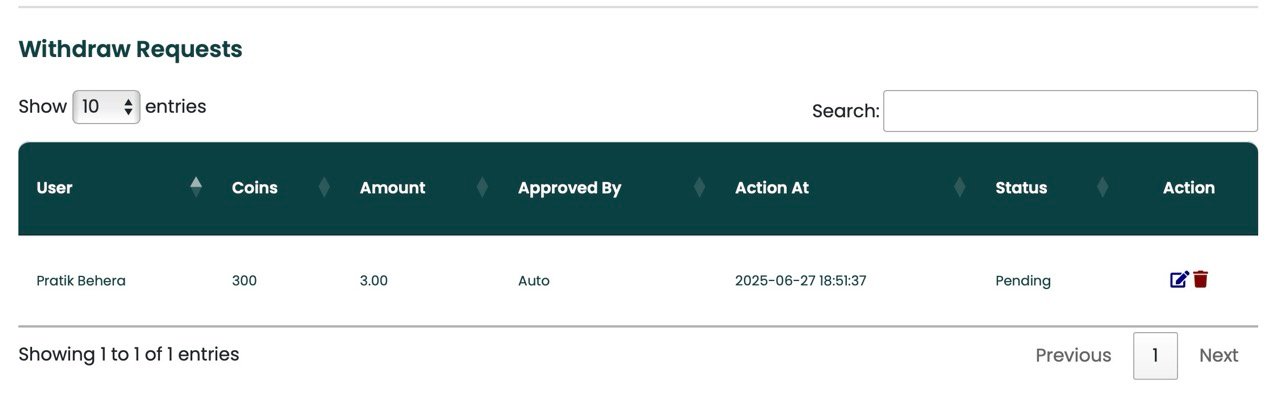
Return to the rewards menu in the left sidebar and select withdraw requests
-
If your withdraw request was successful, it will appear here
-
The rewards will be credited to your account upon approval by our team
Author: Pratik Behera
Last update: 2026-03-13 05:01
How to gift rewards points
-
Locate the left sidebar and select the rewards drop down menu
-
Select my rewards
-
Select Transfer Points
-
Select search Dixwix member
![]()
-
Search the name or email of the user you want to gift to
-
Select the specific user email
-
Provide number of points to be gifted and submit
![]()
-
The points will be transferred upon approval of our team
Author: Pratik Behera
Last update: 2026-03-13 05:01
Points History
This Page Provides a guide to understand and account for the reward points transactions
Credit are points that a user purchases or earns from rentals.
Debits are points which a user spends for renting items or gifting points to other users.
Author:
Last update: 2026-03-13 05:01
Website Help » Account
Account & Subscription Page
Account Subscriptions
Payment Methods
Membership
Author:
Last update: 2026-03-13 05:34
Account Profile

#1 - Enter your name
#2 - Enter your phone number
#3 - Enter your street address (optional)
#4 - Enter your state (optional)
#5 - Enter zipcode (optional)
#6 - Enter item locations
#7 - Add more locations if necessary
#8 - Upload a profile picture (optional)
#9 - Delete your account permanenty
YOU WILL LOSE ALL REWARDS
#10 - Save profile changes
Author:
Last update: 2026-04-09 06:23